Sunday, November 2, 2014

Let's make card series part 4: "Baby cards"

Hi everyone, today I have a few baby cards for you to share. I made two for boys and two for girls. For all four cards I used a cutting file from the silhouette online store and a some heavy kraft cardstock for the card base.


For the background of the first two cards I used paper from Maggie Holmes for Crate paper. I die cut a scalloped circle and glued my title on it. Ti finish the card of, I added some embellishment like a bow, a few buttons and a piece of ribbon.


For the other two cards I partially dry embossed my card base with my mini polka dot embossing folder. I glued a cute die cut on every card, added a piece of ribbon and my title. So simple!


Thank you for stopping by and have great week you guys! 

Thursday, October 23, 2014

Lets make cards series Part 3: "Merry Christmas again"

Hey everyone, this is part three of my kraft card making series and I've got three christmas cards to share with you again. 


For the first one I used patterned 6x6 paper from the DIY Shop by Crate Paper for the background. I put a piece of kraft cardstock on top, stamped a few different snowflakes and doilies with Versamark Ink and heat embossed them with white fine embossing powder. To finish that card of, I added a heat embossed sentiment and a bow with some bakers twine and a button. 


The second card is pretty simple - I just cut out three circles in different sizes from green shiny cardstock and added patterned paper scraps behind each one. After that I applied a tiny bow on the top of each ornament and drew some faux stitching lines around with my white gel pen. At the end, I heat embossed the sentiment with gold embossing powder on a piece of vellum and glued it at the bottom of the card.


The last card I really like the best. It's a scrap lift of a card which I found on the Hero Arts blog. I really love the wreath and the color combo. To create that wreath, I punched out a lot of branches in two different tones, as well as a few little stars in silver and pearlescent rose paper. A few of the stars are covered with silver glitter and a few are covered with stickles in Diamond. Before I glued down the branches, I spritzed a little bit of pearlized water on the background for some extra shine. I added again some faux stitching around the edge of that card with my white gel pen and added a christmas sentiment above a piece of ribbon. 


And that's a closer view on the pretty little wreath. 
I hope you enjoyed these cards, thank you for stopping by and hope to see you soon again!

Sunday, October 12, 2014

Let's make cards series Part 2: "Merry Christmas"

Hey crafters, here's part two of my kraft card making series.


The first one is quiet simple. I used a Christmas paper stack by Glitz design for the background as well as for the four little banners. I topped the card with red velvet ribbon, a tiny button and a little bit of bakers twine. For that little extra I sketched down the word "Merry" and created a 3D look by using liquid pearls in buttercup and garnet. 


For the second card I stamped a lot of different snowflakes on the edges with Versamark Ink and white heat embossed them. After that, I inked all the edges with white chalk ink for a frosted look. In the middle of the card you can see two die cut pieces: a scalloped circle made out of vellum, and golden snowflake. I don't have any glitter paper so I used double sided adhesive tape on some paper scraps and after die cutting, I topped it with fine golden glitter. To prevent a mess, I used a bone folder to rub in the glitter so it won't come off. I've seen this technique in a video by Jennifer McGuire Ink (here's the link to her video). In the middle of my snowflake I glued a golden sequin for a finishing touch.


The third christmas card is a shaker card. I created a vellum pocket by stitching three sides of a rectangle. After stamping and gold heat embossing my sentiment, I filled the pocket with different sizes and shapes of sequins. Then I stitched the fourth side of the rectangle, too so that the sequins won't fall out of the card. At the end I glued a few punched out stars and crystal gems to the card.


My fourth and last card is pretty simple, too. First of all I die cut a snowflake into a piece of cream cardstock and stamped my sentiment with Archival ink. After that I run the piece of cardstock with an embossing folder through my Big Shot to emboss a dot pattern. I used the die cut snowflake and set it a little bit of to create a layered effect and topped it with a little button and bow with bakers twine. To finish the card, I wrapped some of the bakers twine around the card and glued everything to a mat and then to the card base. 

Thank you for stopping by!

Altered Cigar Box

Hey everyone! 
It's time to share another project with you. It's an altered cigar box and I really like the result and how it turned out. It is a cool mixed media project and it was a lot of fun to assemble everything. The cigar box was a birthday present for my mum and I used a vintage photo of her (so cool!).


That's the front of the box. For my background I used the Vintage Paper Stack by Finnabair for Prima Marketing. I die cut a few gears with my Bigz die from Tim Holtz and altered the cardstock pieces to make them look rusty and vintage. I used Distress Paints in metallic colors and Distress Embossing powder for that. Before I glued the gears down, I stamped different patterns with Archival Ink in library green, sepia and black. The stamps were also by Finnabair for Prima Marketing. In the middle of the front I used stickers by Tim Holtz and topped them with metal butterfly embellishments. 


Below you can see the inside of my cigar box. The edges of the box were painted with Inka Gold by Viva Decor, for the background I used again cardstock from the Vintage Paper Stack. I cut out a vintage photo of my mum and added angels wings to her back. The frame is a cardstock sticker which was sprayed with different inks in copper and gold to make it look splotchy and rusty. I embellished the scene with wood veneers (by LaBlanche, covered with metallic distress paints in gold and brass), metal embellishments  (by Prima and Tim Holtz), lace ribbon and epoxy stickers (by DCWV). The ruler at the bottom is an embellishment by 7Gypsies and gives the whole scene more depth.


I used huge metal charms an glued them with Aleene's tacky glue to the inside of my lid. At the background I used Distress inks in different shades and a variety of masks and stamps to create that layered look. 


Thank you so much for stopping by and hope to see you soon again!


Monday, October 6, 2014

just one hike away...

*** Hey everyone ***

Here's another mixed media layout I'd like to share with you. I used a lot of texture paste and different sprays and mists to create this little messy effect. I tried to keep everything in white and mint to match the photo. 


I did some cluster stamping here and there on the background and clustered a few scraps of paper to catch the eye's attention. The stamps are mostly by Prima Marketing. 


I cut out the title with my Silhouette and added some flowers and paperclips as embellishment. 

That's it for today! Have a great Monday =) 

Let's make cards series Part 1: "Masculine Birthday"

Hi everyone, I've been doing a looot of fun cards during the last two weeks. I already started to create Christmas Cards, since it's not that far away. I lately fall in love with kraft cardstock, so all my card bases are made out of it. I cut a 12x12 heavy kraft cardstock into three strips that are 4 inches wide and folded them in half. This way my cards open vertically - I think that this looks great on every shelf and table :) 

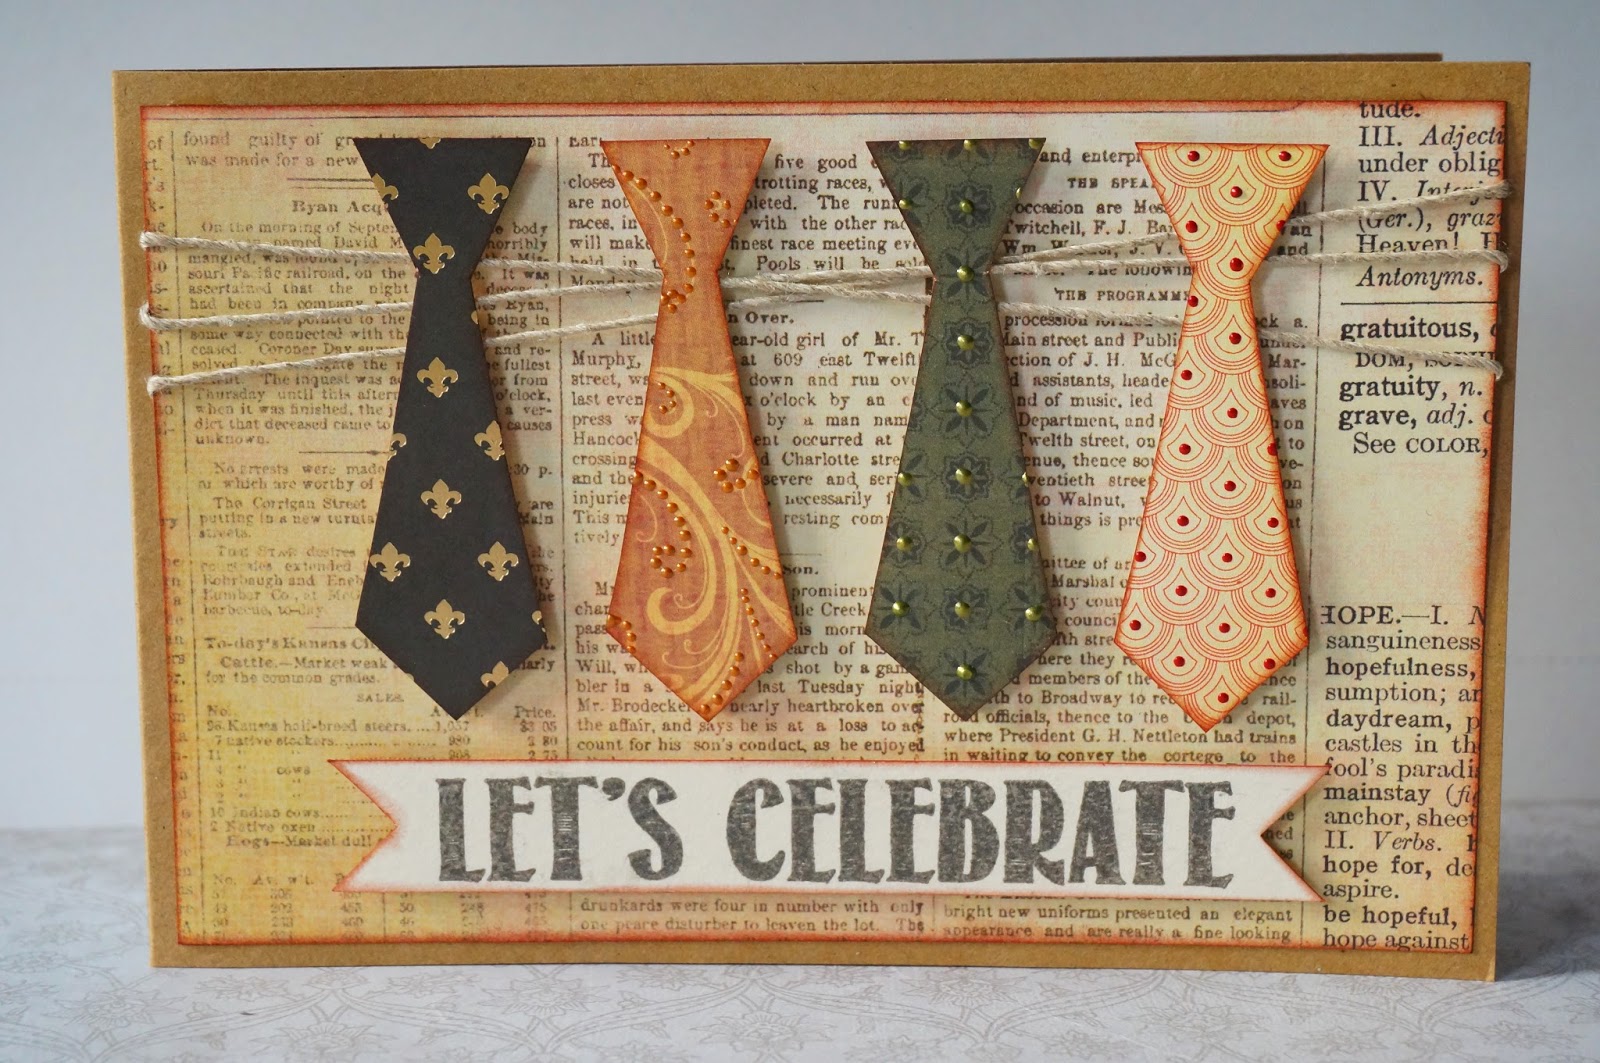
So let's go ahead and let me show you what I've created! The first card is the only one which opens horizontally. It's great for every masculine celebration. I made mine for a birthday. 


I just sketched a a tie on some paper scraps and used it as a template on patterned paper. I used neutral colors to make the card more masculine. The stamp sentiment is from MFT (just love this birthday set).


I added tiny dots of liquid pearls on the ties as a finishing touch (I used the colors Garnet, Avocado and Copper). Underneath the ties I used linen twine.


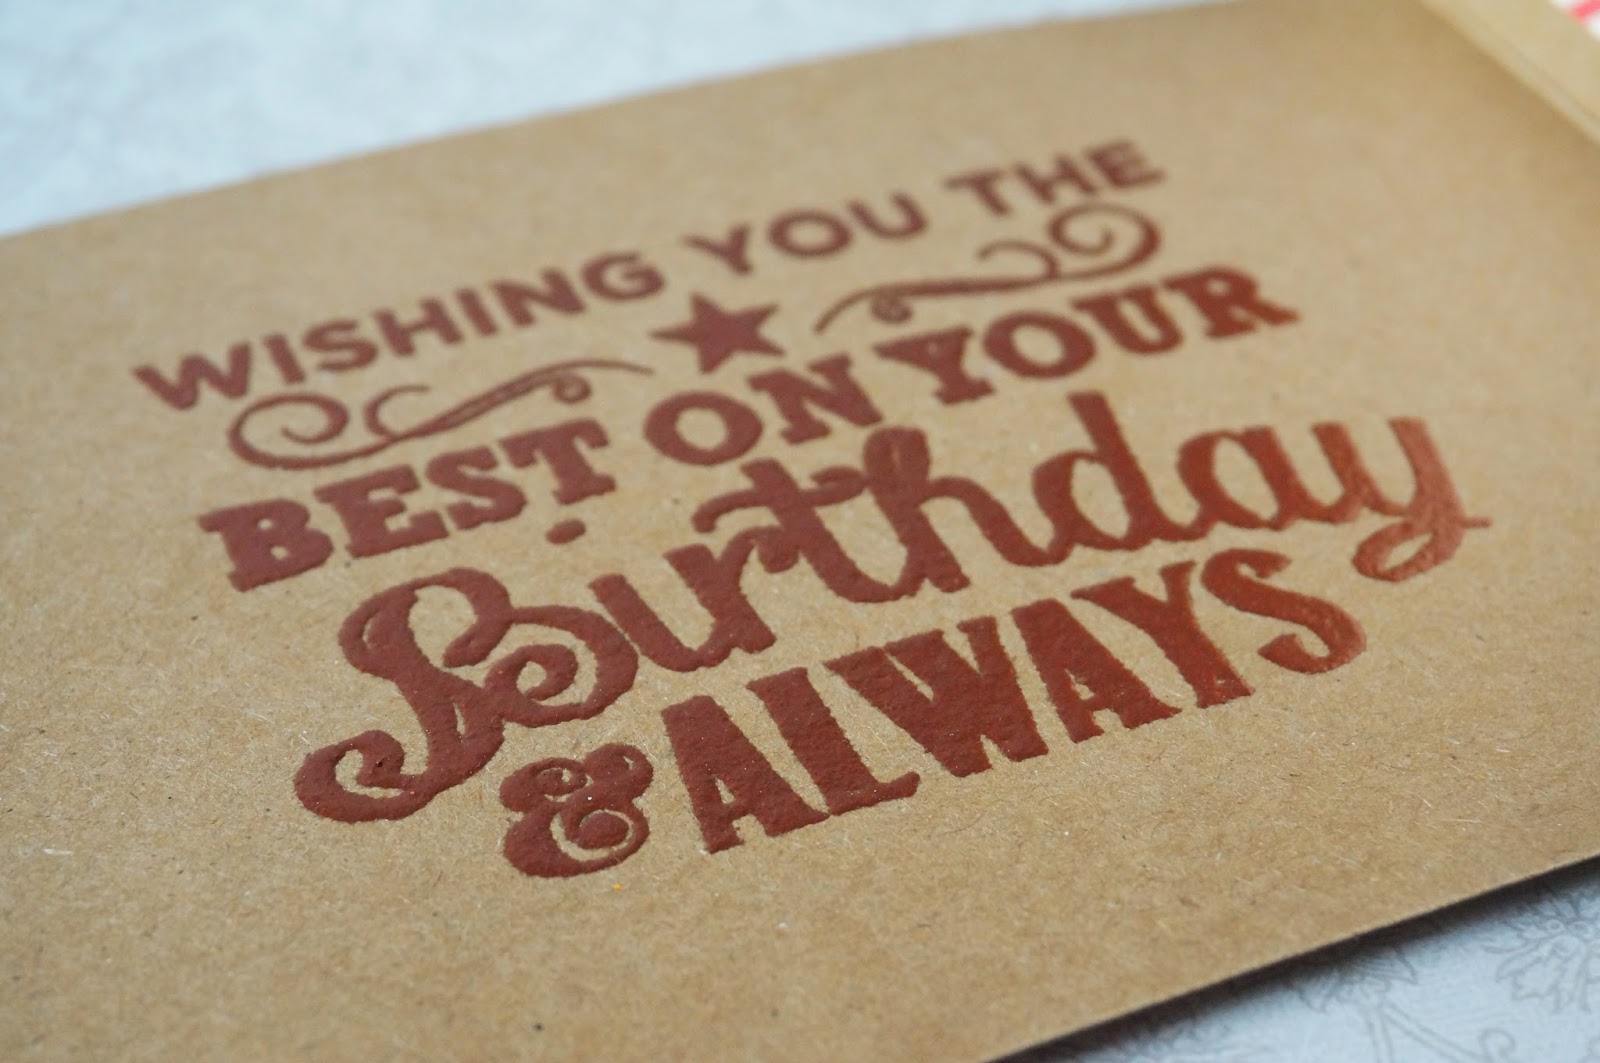
On the inside of the card I used a big sentiment and heat embossed it with embossing powder in dark copper. This stamp is from the same set by MFT as the above mentioned. 


For this card I created five candles by rolling up some patterned paper. In the middle of the rolls I glued a bit of twine to make the candles more realistic. I've created a very similar one a few weeks ago for a friend of mine. 


The stamps are from MFT, too. I inked up all the edges with Distress Ink for a vintage feel and at the end, I "stitched" copper effect twine trough the holes of my card topper for some extra shine.


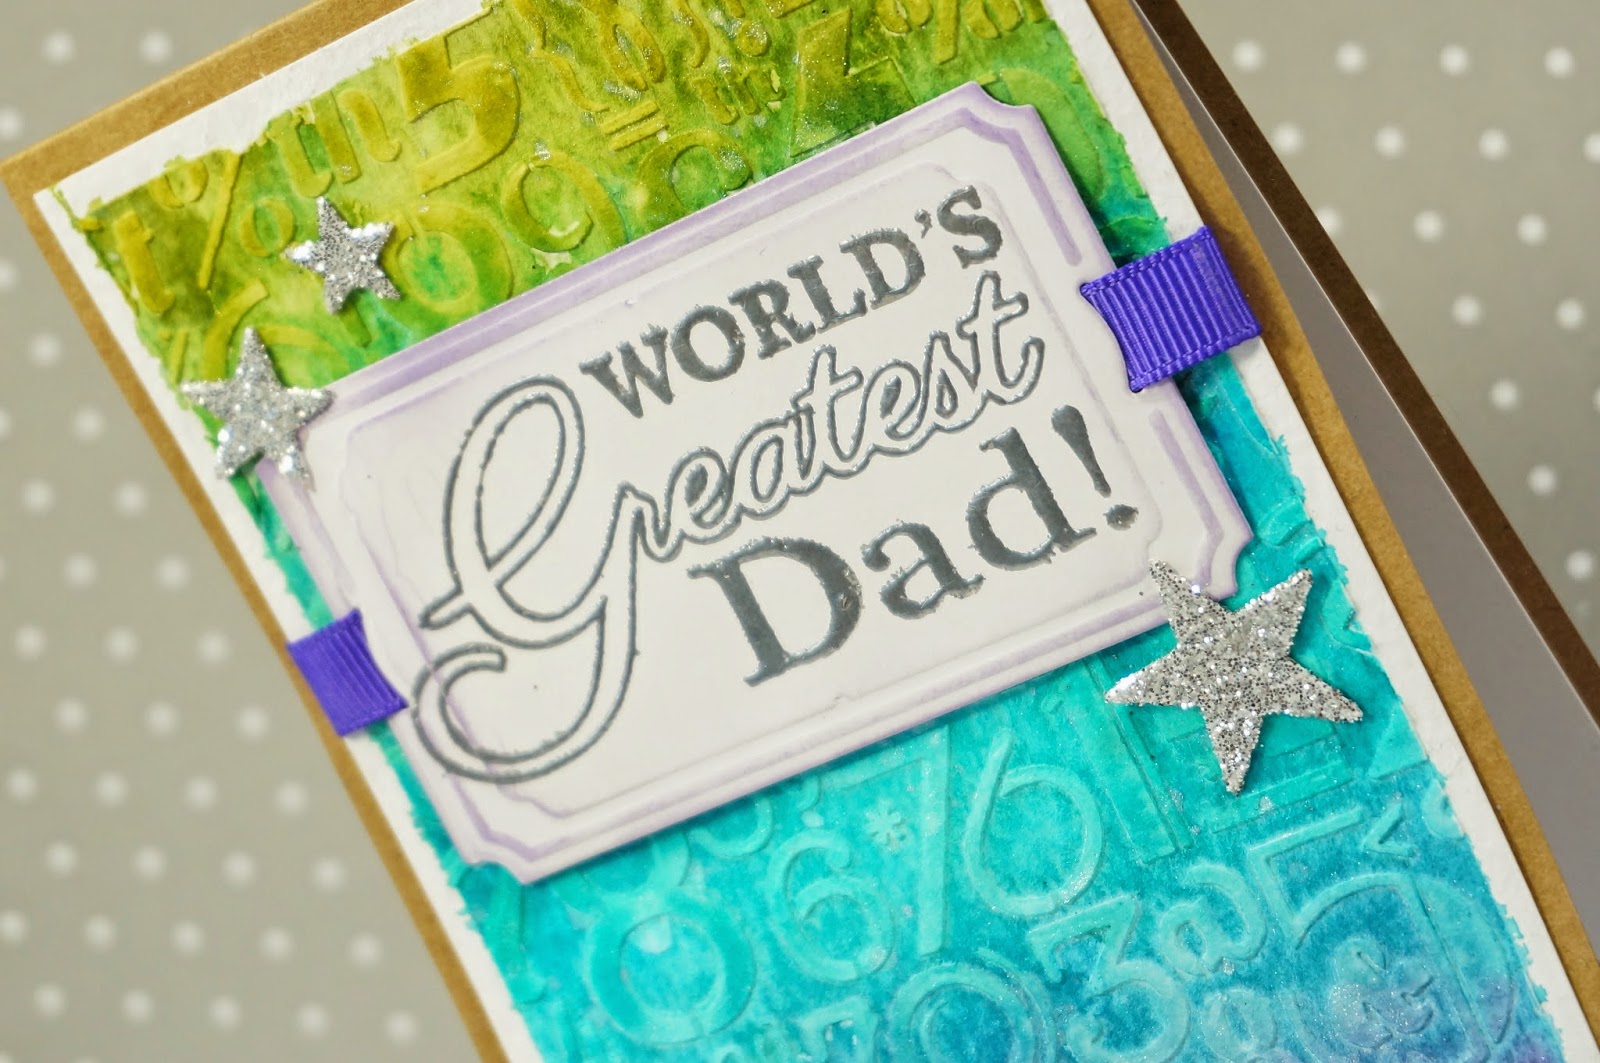
The next card is for all the Daddy's out there. I created my background by using texture paste by Ranger and a stencil from Hero Arts on some watercolor paper. After letting it dry, I inked it with Distress Inks and a Mini Ink Blending Tool to create a nice graduated effect. I used the colors peeled paint, peacock feathers, salty ocean, broken china and dusty concord (from top to bottom).


Before letting the ink dry I spritzed some pearlized water on top to give it a little bit of more interest. Then I stamped and heat embossed the sentiment by Papermania with silver embossing powder and added a bit of ribbon. I die cut the stars with my Bigz Die "Crescent Moon & Stars" on paper which I've covered with double sided adhesive tape. After removing the protection cover, I put sprinkled fine glitter over the stars and rubbed it in with a bone folder, so that the glitter won't come off. By the way you could use this card for Father's Day, too. 

So that was part one, thank you for stopping by and I hope you'll come back for part two!

Hugs, Mrs. Scrapalot

Friday, September 12, 2014

Sketchabilities Sketch Challenge #122

Hey everyone! 
It's been also a long time since I've participated at a sketch challenge, but it's finally the time to do that again :) I created this layout for the Sketchabilities Sketch challenge #122. 


For the background I used a DCWV paper from the tea party stack. For the newsprint behind the stacked photo mats I glued down some tissue paper by Papermania with mod podge. After that I gave the background a few spritzes with 13arts mist in pink and Dylusions mist in bubblegum pink. After that I used a damask mask and some texture paste for more texture. To emphasize this texture I used Inka Gold in rose and rubbed lightly onto the paper with my fingers. 


For the embellishment I used wood veneers by Studio Calico, sugar dots by Prima Marketing and different washi tapes by MME.


I cut out the bird cages of one of the papers from the stack and glued them to background by using foam dots. Besides, I distressed all the edges of the photo mats and inked them with Distress ink. 


And that's their cool sketch I used: 


Thank you everyone for stopping by, and have a great weekend!


Saturday, September 6, 2014

Playful Balloon Card


Hi everyone, 
I have another cute card to share with you. I followed a tutorial by Karen Giron for a MFT challenge to create that card (click here to see her blog and her tutorial).

For this card I used the Maggie Holmes 6x6 collection by Crate Paper. I just love the soft clouds with a hint of light pink for the background. I inked all the edges of the balloons after I glued them together. The butterflies are some free Printables which I printed at home on medium weight cardstock and which I cut out. You can find the butterflies here. To finish the card, I added a stamped sentiment on white cardstock, used a little bit of Stickles here and there and glued three pieces of yarn to card to create the string of the balloons. That's it! 

Thank you so much for stopping by, have a nice weekend!

Friday, September 5, 2014

Shabby Wedding Card

Hey Scrappers,
 I know I've posted only a very few new projects lately, but I've been just too busy to load them up. I created quiet a lot and I'm going to post more stuff in the upcoming weeks. Today I'd like to share a shabby wedding card with you. I was browsing a lot of time on Pinterest and found a super awesome designer Dorota MK. Click here to visit her blog. My project is a scraplift of one of her cards. 


I used different patterned papers and cardstock in cream and light brown for a vintage look. I distressed the edged of my mat and stitched a boarder with yarn. I die cut two branches with a Sizzix die and embellished the card with withe Prima flowers. Then I cut out a scalloped heart and made a boarder with Liquid Pearls in Bisque. The heart on top is covered with crackle accents and inked up with Distress ink for an even more shabby look. I created a 3d banner by folding a long strip of paper and wrote the sentiment by hand. 

I hope you like my creation and thank you so much for stopping by! 

Sunday, August 10, 2014

Masculine Birthday Card

Hi Scrappers, 

I'd like to share a masculine and rather simple card with you today. I created it for the birthday of my friend Sven. 


I used textured cardstock (faux leather) for base of the card. The label was cut with my silhouette and the edges were inked with Distress ink in Vintage Photo. Then I took five different coordinating and masculine paper scraps to create the candles. I just rolled them up and glued a piece of yarn in the middle of the paper roll. To finish the card, I added a handwritten sentiment with two screw brads and and bakers twine in copper for a completed look. 

Thank you for stopping by, I hope you liked it!